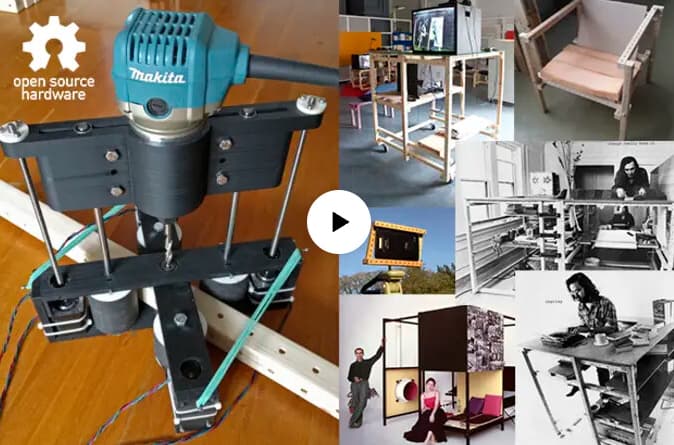
Inspired by Precious Plastic’s video demonstrations of beam extrusion, I’ve been studying a project to make use of them as modular building parts based on the Open Source Grid Beam system. Most folks here may already be aware of this, but to provide some background let me note that Grid Beam is the latest incarnation of the DIY building system first called Matrix and devised in the ’60s by the grandfather of the Maker movement, Ken Isaacs, and introduced in his book How To Make Your Own Living Structures. It was then adapted by the brothers Phil and Richard Jergensen in the ’70s and ’80s into a system called Box Beam introduced in the book The Box Beam Sourcebook then revived with the emergence of the Maker movement as Grid Beam. You can get more details on that here. You can see a nice video about the brothers and their use of the system by Kirsten Dirksen here.
Grid Beam was originally intended for use with wood and later expanded to include aluminum and square steel tubing. Based on the premise that reuse is always more efficient that recycling, it was intended as an intuitive building systems common folks could easily use to design and build their own furnishings, light structures, and small shelters. It was very popular among renewable energy tinkerers in the late ’70s until being pushed aside in popularity by the emergence of extruded aluminum T-slot profiles, which became ubiquitous in industrial automation but has long remained rather expensive.
I believe there is potential to use this with recycled plastic beams and with the US currently suffering both a recyclables glut thanks the current Trade War, and a new wave of Zero-Waste stores emerging and interested in recycled products, there’s small business potential in this.. And in the developing countries, the endless array of things that can be made with this add huge value to Precious Plastic shop projects there.
<span style=”letter-spacing: 0.3px;”>But Grid Beam has one big problem. It depends on the drilling of many precisely spaced holes on all sides of beams up to 3m. This is key to the reusability of the beams and other parts. Any error in the center-to-center spacing of the holes accumulates along the length of the beam, making them useless. This has always proven too difficult for people to do themselves and generally demands the use of multi-spindle drill presses costing over US$10,000. Forming them in-place when plastic beams are made is probably not a practical option given that they must be on all sides, calling for a complex mold. This is the chief reason why Grid Beam has never attained the popularity it might have, the Jergensen bros. being the only parts makers and never maintaining consistent production.
So I’ve been looking for a more economical solution to this for some time. Living in the NM desert (for health reasons) I’ve had trouble finding anyone who can make even the conventional Grid Beam parts for me –since the Jergensens are currently not making them. The basic beam size for Grid Beam is the conventional ‘2×2’ lumber. (actually, 1.5″x1.5″ using a 1.5″ hole spacing) This is actually a stock size for the manufacturers of recycled plastic lumber decking, so stock material to experiment with is available. It’s the hole drilling that makes everything a hassle.
At present, CNC machines are competing with the multi-spindle drill presses in cost, But neither is a low cost option suited to the developing world shops. I’d like to hear what others think about this, and what solutions they might have.
I think, you can build something with rollers, drills and pistons.
You would use rollers for 3 different purposes: guiding the beam, pushing the beam, and 2 to measure by how much you pushed the beam.
you would have clamps powered by the pistons to keep the beam in place while you drill.
For drilling, you’d have 2 drills operating at the same time, slowly being guided by pistons or 1 axis motored thing, going in through a standard process of drilling bit by bit and going out.
Then you unclamp, roll, repeat.
See the attached image for more of an idea.
little correction after receiving new data : beams of 4×4 cm with top notch surface finish and consistency can be done with 0.75 Kw, 3phase, 1:30 for about 60 cm long but there is a but : we’ve made a special extrusion screw for this configuration, the screw parameters (pitch, section length,… ) have been adjusted to exactly that diameter, motor and plastic type as well heat conditions. It seems possible to extend the length of the beams by halfening the cross section of the beam.
Hey Team,
Is there a tried and true way to make an 8 foot 2 x 4 or 2 x 6 deck board? Seems to me that simple deck boards are a very useful product that most recycling centers can make and sell.
I’m sure it’s already out there somewhere, but I’m seeking the correct recipe and technique to produce simple deck boards that people can use everyday.
Thanks,
Darsie from Alaska
Many great suggestions here. Thanks much. I thought I would note there was, for a time, a small metal jig offered by the Jergensens, back when they were still using the name Box Beam. It was composed of a small rectangular strip with a couple of holes and, I think, one metal peg. But they stopped selling this after a time because they were wearing out very quickly. Not sure if this was due to how they were made (perhaps the quality of steel) or if the number of holes people had to drill just made it short-lived. Nothing like this is mentioned on their current web site or the newer Grid Beam book.
yes, I was referring to Stan’s alu-folie/wood molding technique, which definitely deserves it’s place in the v3/v4 portfolio but he already said it’s excessive labor. you could extrude round bars and also extrude the slider (ring) through a ring-roller attached to the extrusion (needs saw) and after cutting them off; you need to seal the slider with metal clips (there is enough in the shelf as well; ideally it hosts the nut and then you still need a set screw to lock it on the beam (which isn’t really trivial as it seems). i am favoring continues process over injection; this kind labor needs to financial back up; i doubt someone has the privilege to make this for free, 24/7; just for ‘fun’.
Such a slider is a good idea anyway, not just for use with the plastic beams…
And I indeed know the techniques to which thou refereth (sorry, got some Shakespear stuck in my throat ) Portable desktop injection machine (if I am correct)
Let me start though by trying to (low tech) produce a small beam and see what happens. I always tend to go for ‘all of the above’, so no topic input will be wasted.
Also thank you @erichunting for staring this interesting topic!
developing a drill machine needs around 500e (steppers, sensors, GBRL/arduino, quite a mess) and 2 weeks time for a geek but it’s likely removing strength from the beam; instead you could create a slider for the beam (custom profile) which has the sockets for the bolts; if you really need that in plastic as well, @s2019 developed a good technique to make those as well otherwise there are enough in the shelf; there are lots of catalogs for joinery, special bolts, etc… just open them up and you will find thousands of ideas.
Casting the holes would indeed add to the complexity.
It was just a thought as I was considering casting from the side, not the top, which would make it possible.
From a design point of view though the shinkage might even be an advantage, making the shape more organic. When not strictly used for constuction, the beams are only the placeholders for the holes, possibly adding some aestethics to an otherwise mostly technical product.
I think I saw a post where someone was making beams by stuffing hot plastic into a horizontal mold. For something long, I would consider heating the mold, melting the plastic in place, and compressing with spring loaded clamps. Considering how much HDPE shrinks, casting in the holes may be more trouble than it is worth.
i like the compression mold idea; if you make them extendable, grow on the go that would do not much involved as Donald suggests. if you could get joinery metal stuff in there to connect it to each other, then perfect.
we’re drifting off-topic
I was indeed thinking as ‘low-tech’ as without using v3/v4 machines at all.
A long mould, with one set of ‘holes’ already in place and then basically ‘pouring’ molten plastic in the mould and pressure clamping it.
Should at least work with small beams.
Should also give some spectacular failures the first few tries, but hey, it would not be much of an experiment if it went right from the start
I would consider a clamped compression mold. Using cartridge heaters along the length, I’m not sure you couldn’t do 2m in something like 4×4 cm. with a little luck you might be able to do I-beams or at least C-beams.
til a certain size you can go low-tech. sure. i would say a good 2×2 cm beam is possible with v3, v4 but you still have to spin up a heavy 2Kw planer to get a nice finish. after that there will be lots of labor involved to get those holes, may be getting hex sockets in there might be ok as well. so that comes down to an hour per meter or so, just guessing. thatś why the metal beam combo could get you somewhere faster and cheaper though. we had efforts in place, hand-in-hand with professional recyclers to enhance extrusions with carbon fiber but we lost financial backup, evtl. some other guys pick it later up again. there are few videos on youtube about making beams, none of them suggested low-tech so far. in PP terms, eventually its even better to stay small but good. there are quite some applications for small structural material…a small CNC is one of them.
Would be interesting to find out if there are also low-tech solutions for ‘baking beams’, if only by welding shorter beams into longer beams.
For me (Urban Homestead) a 4-6Kw machine is not an option, but then again, I don’t need ‘proffessional’ beams.
If the Plastic Grid Beam concept works however investing in a workspace with the right (heavy) equipment might be worth it, especially when combined with producing wood and metal beams, as those investments would be relatively cheap in comparisson (assuming you e.g. already have a drilling rig for the plastic anyway).
Success would depend on the unique ‘designs’ you can create of course, but the higher investment cost also means not just anybody can copy you…
If you can control the surface and color, the composite deck boards (HDPE and wood byproducts) are popular and cost about $50+/sq. meter. Since it is outdoors, fire safety is a little less critical.
to make a good 4×4 cm beam (good surface finish, consistency), you need an extrusion system in the 4-6 Kw range; it’s a precise machinery; one heat-band with cooling and PID unit is around 800 E new. the smallest systems have a screw diameter around 5-10 cm; the cheapest second hand machines (needs lots of work, incl. screw rebuild) start in the 15K range.
I agree using the plastic beams for the critical support of an object might not be the wisest of choices, but as in the video, where they use metal beams for strength and wood for everything else, having compatible plastic beams, with their own specific characteristics might be a good addition to the ‘grid beam’ concept.
Especially because these indeed could have highly customisable shapes, more so than the metal or wood.
yeah; i know for fact there are tons of recycled plastic beams in the shelfs all over the place, often subsidized; not selling well. if one can find a way to combine alu/metal extrusions in a way that such plastic beam could act as the popular T/V-slot beams (or host them), there you could have a product.

 )
 not much involved as Donald suggests. if you could get joinery metal stuff in there to connect it to each other, then perfect.